How Long Does Stucco Resurfacing Take? A Step-by-Step Timeline for Sellers
If your realtor flagged the exterior and your listing date is already on the calendar, the first question is a practical one: how long does stucco resurfacing take from first walkthrough to photo-ready walls? The stucco resurfacing timeline for most single-story Scottsdale homes is three to seven working days, plus cure time before paint. That is the honest number, and it is short enough to fit almost any pre-listing schedule.
Resurfacing is the middle option a lot of contractors skip past. If your walls are faded, hairline-cracked, or patched in mismatched colors, but the stucco underneath is still solid, you do not need full replacement. Stucco resurfacing puts a new finish coat over the existing wall, so you get a uniform color and texture without tearing anything off. That matters in Arizona, where stucco remained the exterior wall material on 48% of new single-family homes started in 2024 in the Mountain division, according to the National Association of Home Builders. Buyers here know what tired stucco looks like, and they know what fresh stucco looks like.
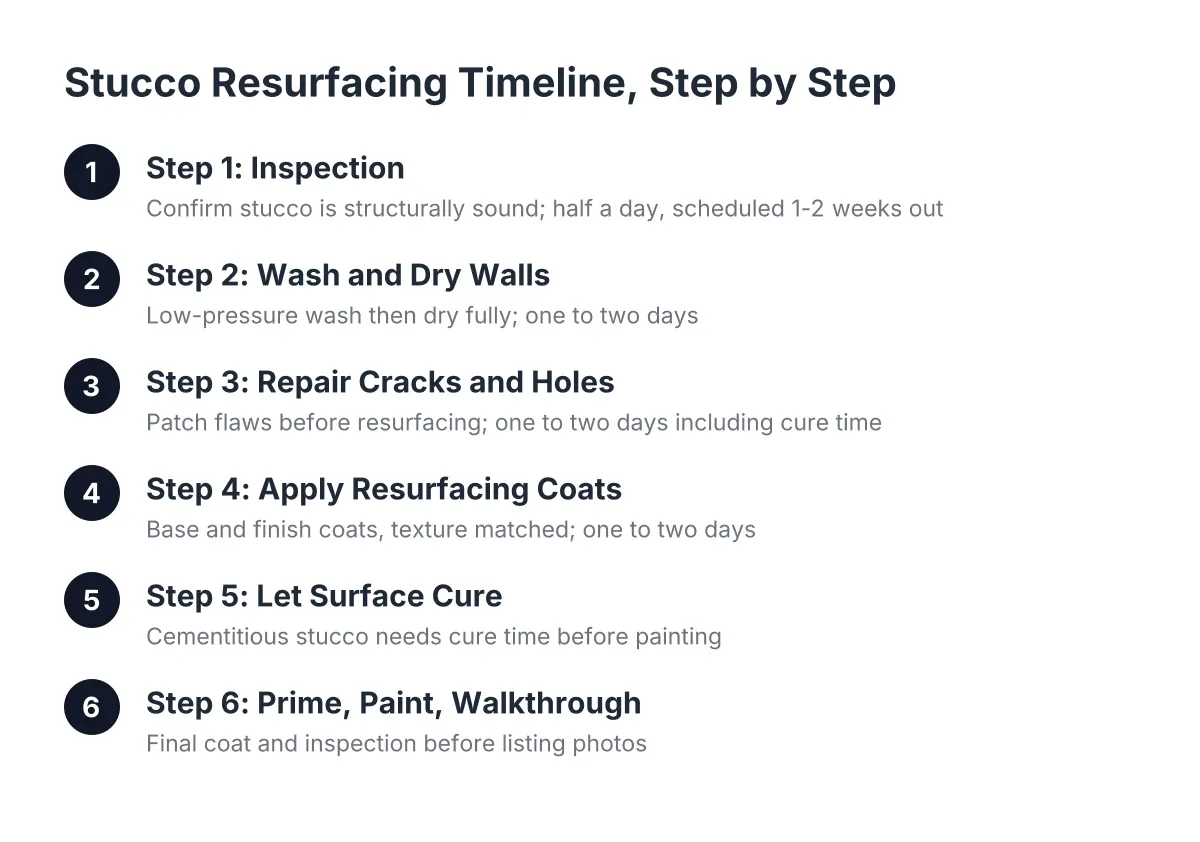
Here is the process, step by step, with realistic time attached to each stage so you can back-plan from your listing date.
Step 1: Inspection to Confirm Your Stucco Resurfacing Timeline
Before anything else, have someone confirm the stucco is structurally sound. Resurfacing covers cosmetic problems; it does not fix what is underneath. A contractor will check for soft spots, bulging, wide structural cracks, and signs of water damage behind the surface.
This inspection takes an hour or two. If the walls pass, you can move straight to scheduling. If the inspector finds water damage or delaminating stucco, those areas need repair or replacement first, which adds days to the timeline. Better to find that out now than after photos are booked.
One honest limitation: does resurfacing fix cracks? Hairline and surface cracks, yes; the new coat fills and hides them. Cracks wider than about an eighth of an inch, or cracks that keep reopening, point to movement in the wall and need crack repair before the finish coat goes on. If an inspector or appraiser already flagged specific damage in a report, address those items directly rather than hoping a skim coat buries them.
Time budget: half a day, scheduled one to two weeks out depending on the season.
Step 2: Wash the Walls and Let Them Dry
Resurfacing material will not bond to dirt, chalky paint, or organic growth. The walls get washed first, usually with a low-pressure wash rather than blasting, because stucco is porous and high pressure can drive water into the wall or chew up the surface. On shaded north-facing walls where growth has embedded over years, the cleaning solution needs dwell time to soak into the pores, and heavy buildup sometimes needs a second treatment.
After washing, the walls must dry completely. In Scottsdale's dry heat, that often means one day. In cooler or damper stretches, plan on two.
Time budget: one to two days, including drying.
Step 3: Repair Cracks, Holes, and Damaged Patches
Next, the crew handles the individual flaws before the new coat goes on. Skipping this step is how resurfacing jobs fail; a new finish over an unrepaired crack will telegraph that crack back through within a season.
Typical prep work at this stage includes:
- Routing out and filling cracks wider than a hairline
- Patching holes left by old fixtures, satellite mounts, or woodpecker damage
- Grinding down or cutting out old patches that sit proud of the wall
- Sealing gaps around windows and penetrations, using backer rod in deeper joints so the sealant has a proper foundation, a standard practice noted by Sika
For a house with scattered cracks and a few bad patches, this is one working day. Fixr.com puts the national average cost to repair stucco at $900 to $3,000, averaging about $1,700 for a buckled 10×10-foot section of three-coat stucco; that gives you a rough sense of what heavier repair adds if the inspection in Step 1 turned up real damage.
How long does stucco repair take to dry before the next coat? Cement-based patches generally need 24 to 48 hours to cure enough to coat over. Rapid-setting polymer-modified patch products cut that down, since they replace the traditional scratch-and-brown sequence with a single application, but even those need time before the finish coat.
Time budget: one to two days, including patch cure time.
Step 4: Apply the Resurfacing Coats and Match Your Texture
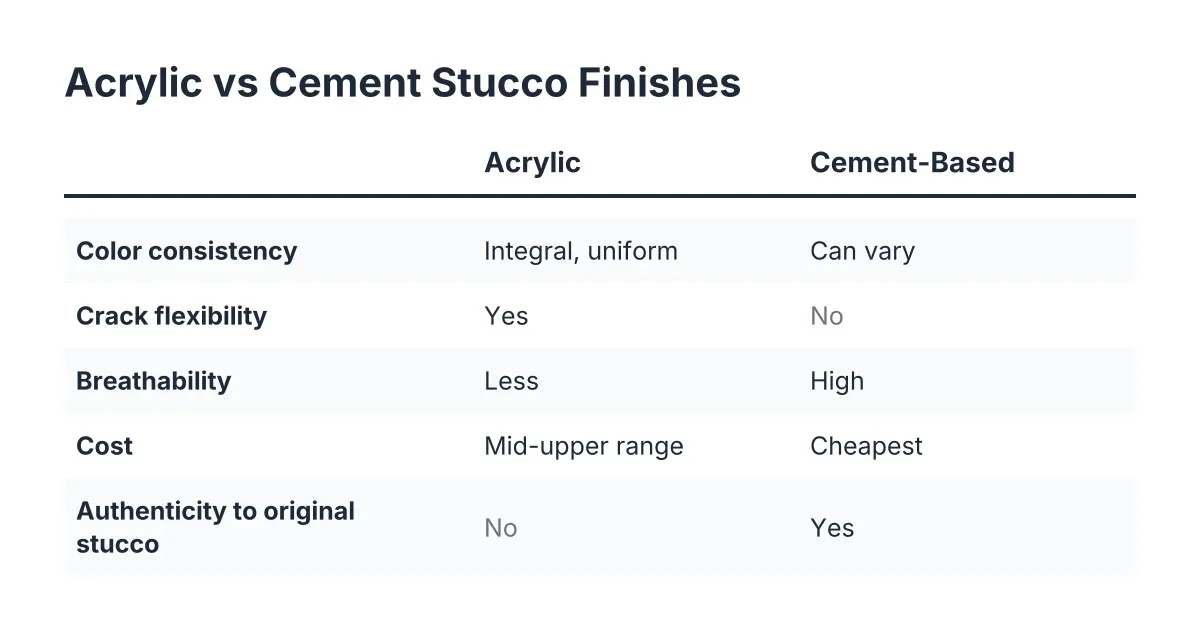
Now the actual resurfacing. Depending on the wall condition and the material chosen, this is either a single skim coat or a two-coat job: a base coat first, then a finish coat once the base has set up. A traditional cement finish gets troweled on and textured to match the existing walls; an acrylic finish goes on thinner and carries color in the material itself.
An experienced crew can apply more than one coat in a single day when conditions allow, because dosing set accelerators correctly is a skill; too much and the mix hardens in minutes before it can be worked. In practice, plan for one to two days of application on an average single-story home, longer for two stories or heavy texture matching.
The stucco resurfacing timeline for texture matching deserves a mention for anyone selling. The finish coat is where the crew blends the new surface into any untouched areas, so old patch outlines disappear. If your complaint is "the stucco patch doesn't match," this coat is what fixes it, on every wall at once.
Time budget: one to two days of application.
Step 5: Let the New Surface Cure
Here is where the calendar matters most for a seller. Fresh cementitious stucco needs cure time before it can be painted or sealed. The surface feels dry within a day, but the material keeps curing underneath. Painting too early traps moisture and causes peeling, which is the last thing you want a buyer's inspector to find.
So how long does stucco resurfacing need to cure before paint? For a cement-based finish coat over sound existing stucco, most jobs are ready for primer in 7 to 14 days; a thin skim coat cures faster than a thick base-and-finish build. Acrylic finishes are different: the color is integral, so there is often no paint step at all, and the wall is photo-ready within days.
That difference drives a real decision for pre-listing sellers:
- Tight deadline, two weeks or less: choose an acrylic or pre-colored finish so you skip the paint cure window entirely.
- Three weeks or more: a cement finish plus paint gives you the widest color choice and a fully repainted exterior for the listing photos.
- Somewhere in between: resurface now, schedule paint for the last week before photos, and keep the cure clock in mind.
Time budget: zero extra days for integral-color acrylic; 7 to 14 days of cure before paint for cement finishes.
Step 6: Prime, Paint, and Do the Final Walkthrough
If you are painting, the sequence is fixed: wash was already done, so now it is prime, then paint. Masonry primer and two coats of exterior paint on an average single-story home take two to three days, including dry time between coats. Walk the house afterward in full daylight, the same light your listing photos will use, and check the areas that photograph worst: around windows, at hose bibs, and along the base of walls.
Time budget: two to three days if painting.
Stucco Resurfacing Timeline: Start to Finish
Stucco resurfacing on a typical single-story home takes three to seven working days of labor, and two to three weeks total when a cement finish needs to cure before paint. With an integral-color acrylic finish, the whole job can wrap inside one week. Scheduling lead time comes on top of that.
For example, suppose a homeowner in McCormick Ranch lists in four weeks and the realtor flags faded walls, hairline cracks near the windows, and two old patches that never matched. In that scenario, a typical sequence looks like this: inspection this week, wash and repairs early next week, resurfacing coats midweek, then either photos the following Monday with an acrylic finish or paint in week three with a cement finish. Either path beats the photo deadline with margin.
Two closing points worth knowing. First, resurfacing is not paint with extra steps; a proper finish coat restores the wall surface itself, which is why stucco lasts as long as it does when maintained. Second, if the inspection in Step 1 turns up water damage, bulging, or stucco pulling away from the wall, stop and get a professional assessment before committing to a resurfacing plan, because covering a failing wall wastes the money and can complicate your disclosure paperwork. Handled in the right order, though, this is one of the faster, cheaper exterior fixes a seller can make, and in 2026 it remains the option most homeowners never hear about because full replacement is the bigger ticket.
If you need stucco repair, Scottsdale Stucco Repair can help.
Prefer to talk it through? Call (480) 637-3464 — a quick call is usually the fastest way to get a straight answer for your situation.