DIY Stucco Patch Kit vs. Professional Repair: When to Hire a Scottsdale Pro
Walk into any hardware store in Scottsdale and you will find a diy stucco patch kit for under thirty dollars. The box promises a fix for cracked, damaged exterior walls in an afternoon. Sometimes that promise holds up. Often it does not, and the homeowner ends up paying twice: once for the kit, and again for a contractor to cut out the failed patch and do it right. This guide walks through the actual decision, step by step, so you know before you open the tub whether you are looking at a true DIY job or a repair that needs a licensed local crew.
That matters here more than most places. Stucco is the dominant exterior in this region; the National Association of Home Builders reports stucco covered 48% of new single-family homes started in the Mountain division, which includes Arizona, in 2024. Nationally, the U.S. Census Bureau found stucco was the principal siding on about 27% of homes that began construction in 2023. In Scottsdale, when your exterior wall cracks, it is almost always a stucco question, and the repair-or-hire decision deserves more than a guess.
Step 1: Measure the Damage Before You Buy Anything
First, get specific about what you are dealing with. The size, width, and depth of the damage decides everything that follows, and most homeowners skip this step and buy a diy stucco repair kit based on hope.
Grab a tape measure and a flathead screwdriver, and check three things:
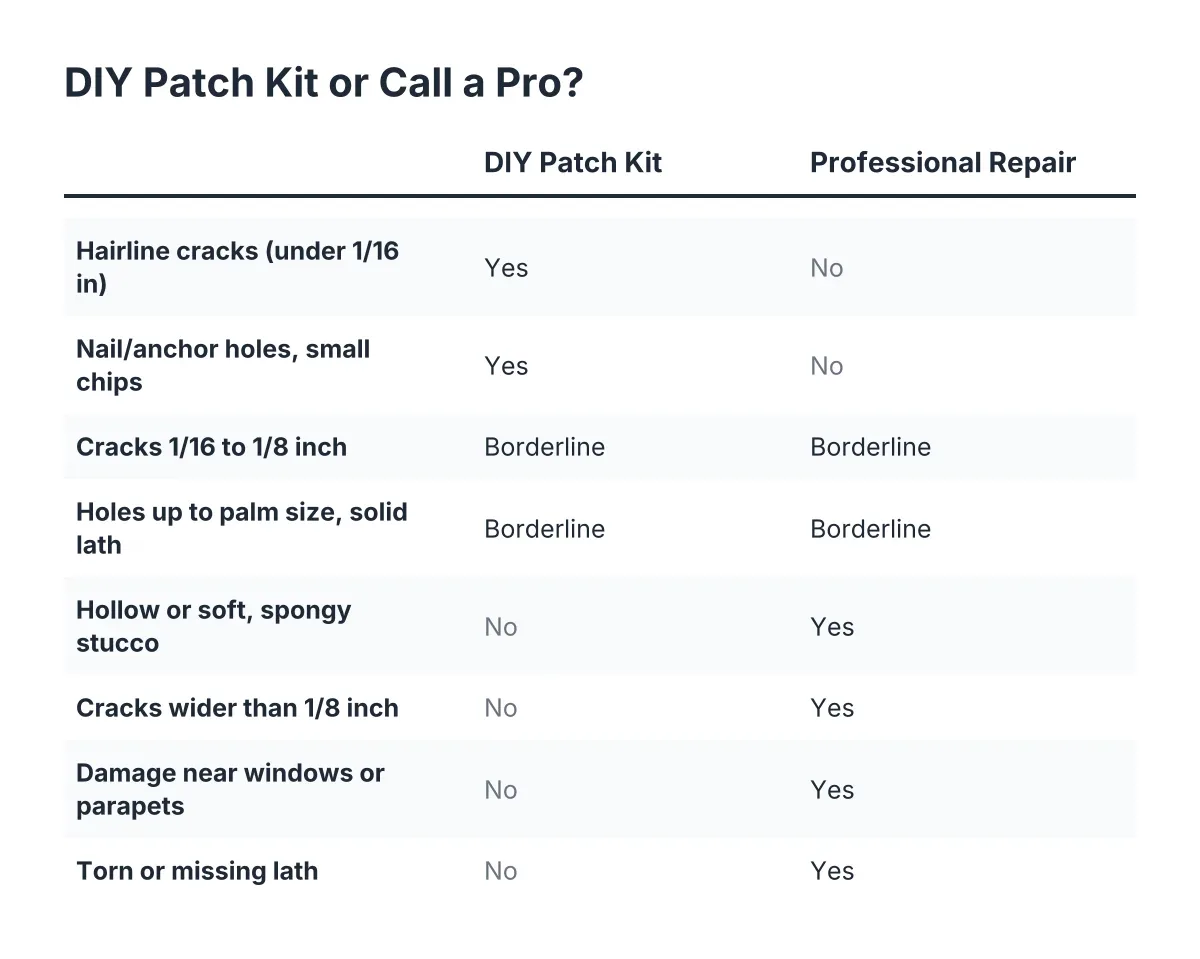
- Crack width. Hairline cracks under about 1/16 inch are surface-level and the best DIY candidates. Cracks you can slide a credit card into are structural movement showing through, and a patch will not stop them from reopening.
- Hole size. A golf-ball-sized hole from a doorknob or a sprinkler strike is patchable. Anything larger than your palm usually means the lath behind the stucco is damaged, which changes the job entirely.
- Softness. Press around the damaged area. If the stucco feels spongy, crumbles, or sounds hollow when you tap it, water has gotten behind the wall. That is water damage, not a cosmetic crack, and no patch kit addresses it.
Also walk the whole wall, not just the spot that caught your eye. One crack with five siblings along the same line points to settling or vibration, and patching one of six cracks solves nothing.
Step 2: Find Out Why It Cracked, Not Just Where
Next, ask what caused the damage, because a patch over an active problem is a temporary bandage. This is the step that separates a repair that lasts from one that reopens by next summer.
Common Scottsdale culprits are predictable. Thermal cycling between 110-degree afternoons and cool desert nights works stucco hard. Irrigation heads spraying the base of a wall feed water damage from below. Settling around additions and garage corners pulls cracks diagonally from window and door corners. A partial patch is a fair, cheaper alternative to larger work, but only if the underlying cause gets handled too; otherwise the crack returns and you are back at the hardware store.
If you cannot explain why the crack exists, that is itself an answer. Unexplained or recurring cracks are worth a professional set of eyes before money goes into materials.
Step 3: Choosing a DIY Stucco Patch Kit for Small Repairs
A diy stucco patch kit handles one job well: filling small, stable, cosmetic damage in otherwise sound stucco. Pre-mixed polymer-modified patch products can replace the traditional three-coat system in a single application for small repairs, which is exactly why they exist. For a hairline crack or a small hole with intact lath behind it, they work.
Here is where the kits fit, honestly stated:
- Good DIY fit: hairline cracks, nail and anchor holes, small chips at corners, scuffs from a trash bin or ladder.
- Borderline: cracks between 1/16 and 1/8 inch, holes up to palm size with solid lath behind them. Doable if you accept the patch may show.
- Not a kit job: hollow or soft stucco, cracks wider than 1/8 inch, damage near windows or parapets, anything with torn or missing lath, staining that suggests moisture behind the wall.
For small projects, a pre-mixed tub or bag beats mixing raw ingredients the way a mason would for a full wall. Keep your expectations on working time, too; fast-setting repair compounds give you a short window once mixed, so mix small batches and work in shade, not afternoon sun.
What the Box Never Tells You
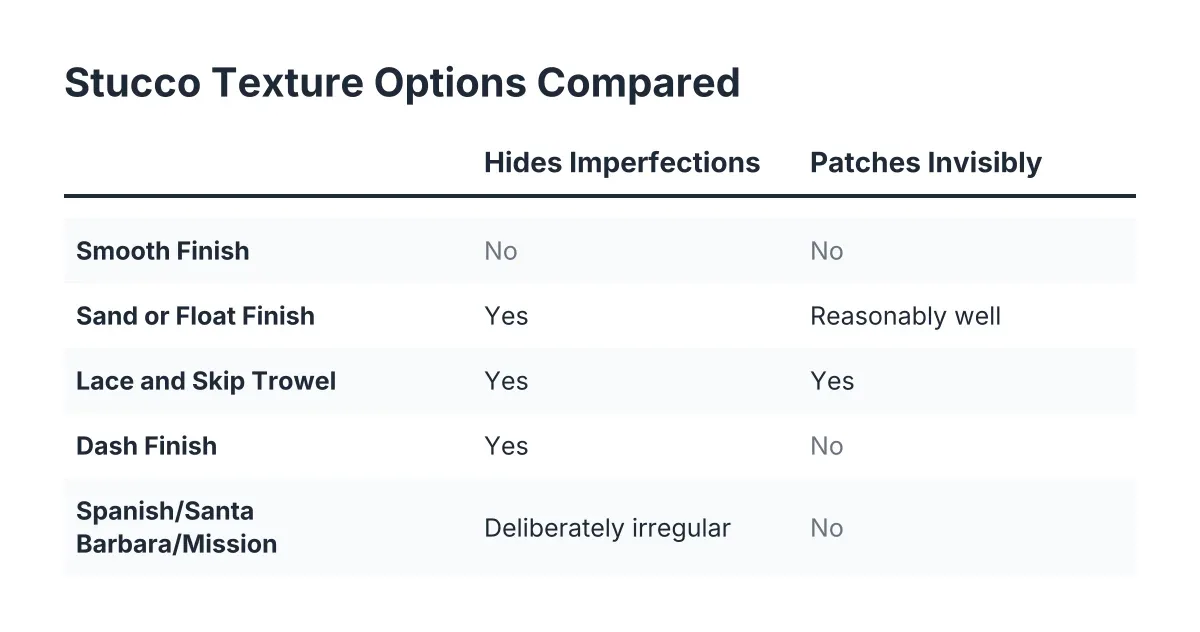
The hard part of exterior stucco repair, DIY or not, is not filling the hole. It is making the patch disappear. Scottsdale homes carry specific textures, such as sand, lace, or smooth troweled finishes, and a kit gives you material, not technique. A patch with the wrong texture reads from the street, and a visibly mismatched repair is usually the fingerprint of someone who did not match the original finish method. Color is the second trap; even a perfect texture match in the wrong shade of desert tan stands out until the whole wall gets painted.
Step 4: Apply the Patch the Right Way If It Qualifies
If your damage passed Step 3, do the small job properly. Clean out loose material with a wire brush, undercut the edges slightly so the patch locks in, and dampen the area before applying compound. A steel trowel, a rubber float, and a hawk cover most of the handwork; the hawk earns its keep on spot repairs because it holds material at the wall while you place it.
However, resist the urge to finish in one session. Professionals can run multiple coats in a day because they know how each coat behaves; a homeowner should apply one coat, let it set overnight, and come back for the next. Rushing coats is the most common way a diy stucco patch fails, because the layers never bond and the patch shrinks or delaminates within a season.
Recreate the texture while the final coat is workable, using a float, sponge, or flicked brush to mimic the surrounding finish. Practice on a scrap board first. A properly matched and painted patch should become hard to pick out from the surrounding wall; that is the standard, not "filled."
Step 5: Know When Hiring a Local Stucco Contractor Costs Less
This is where the math surprises people. According to Fixr.com, the national average cost to repair stucco runs $900 to $3,000, averaging around $1,700 for buckled three-coat stucco in a 10×10-foot area. A thirty-dollar kit looks cheap against that, until the kit fails and the contractor now has to cut out your patch, open the wall wider, and rebuild.
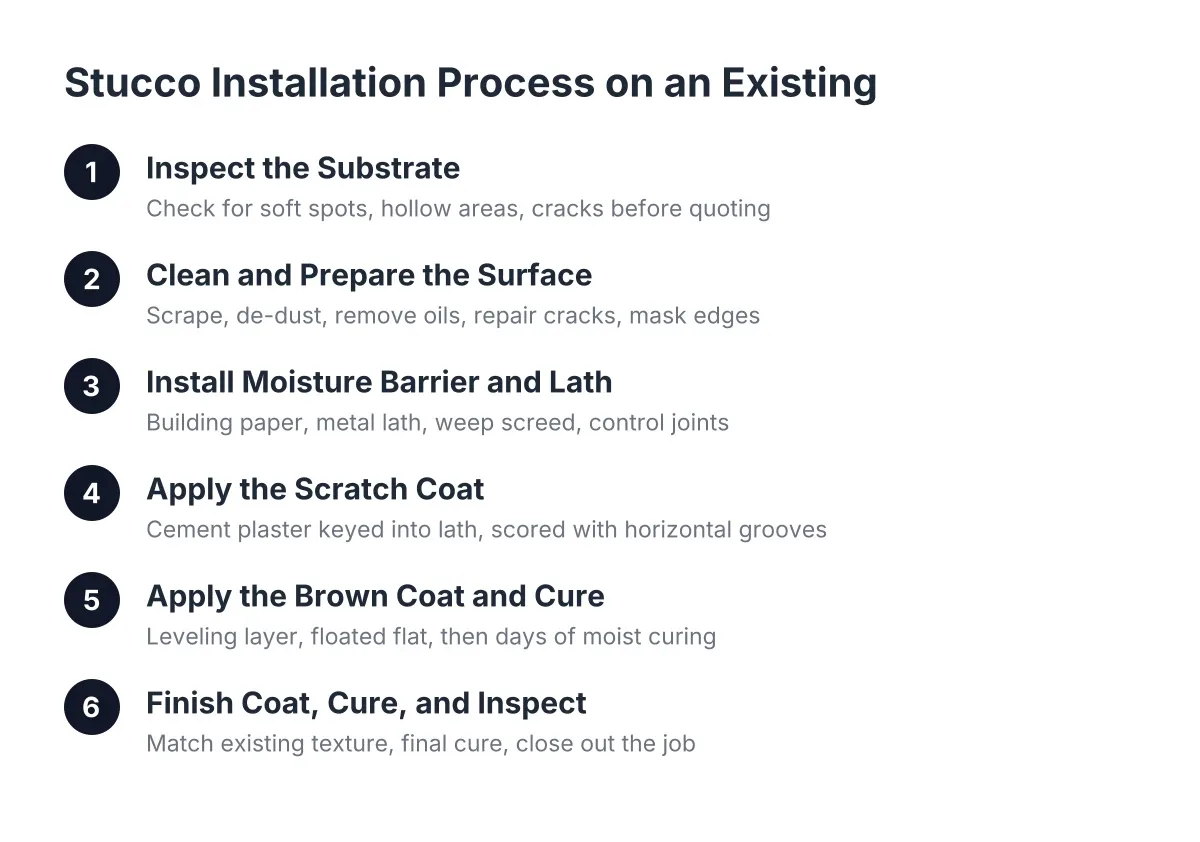
For example, suppose a homeowner in north Scottsdale grinds out a crack with a clean, straight cut before calling anyone. That tidy cut slices the lath flush, and the crew now has to open more wall to find torn lath they can tie the new weatherproofing into. The DIY prep added cost instead of saving it. Scratch and brown coat work in general is harder than it looks, which is why even capable DIYers are better off hiring out anything beyond the finish layer.
The same logic scales up. An HOA board looking at cracking along a community perimeter wall or an entry monument is not looking at a patch-kit problem at all; that is a scoped stucco repair or stucco replacement project with formal bids, and a tube of compound from a volunteer resident tends to create a patchwork the whole community sees. Full Stucco Installation on an addition or a new exterior wall sits even further outside DIY range, since three-coat application over properly lapped paper and lath is a trade skill, not a weekend project.
Hire out the job when any of these apply:
- The stucco is soft, hollow, or stained, pointing to water damage behind the wall
- Lath or weather barrier is exposed, torn, or missing
- Cracks are wider than 1/8 inch, recurring, or spreading from corners
- The damage sits on a prominent wall where texture and color matching matter
- The repair is on shared HOA property where a visible patchwork invites complaints
Step 6: Vet the Contractor Before Money Changes Hands
Finally, if the job calls for a pro, vet them the way you would vet anyone touching your biggest asset. You have likely heard the stories: the cash-only quote with no contract, the deposit that vanished with the truck. Those stories are why a careful homeowner checks paperwork before signing anything in 2026, and a legitimate contractor will not flinch at the questions.
Ask for a written scope that names the repair method, who handles texture matching and stucco color matching, and what happens if the patch fails. Verify licensing through the Arizona Registrar of Contractors and ask for proof of insurance; a real local crew produces both without hesitation. Be wary of a quote dramatically below the others, since underpriced stucco work usually means a skim coat over a problem rather than a repair of it. One honest trade-off to accept: a quality repair on textured stucco may still show faintly until the wall is repainted, and a contractor who tells you that upfront is being straight with you, not hedging.
The short version of this whole guide fits in two sentences. A diy stucco patch kit is the right tool for small, stable, cosmetic damage you understand the cause of. Everything else, from hollow walls to HOA perimeter cracking, costs less in the long run when a licensed Scottsdale stucco contractor fixes it once, in writing, and stands behind it.
If you need stucco repair, Scottsdale Stucco Repair can help.
Prefer to talk it through? Call (480) 637-3464 — a quick call is usually the fastest way to get a straight answer for your situation.