Stucco Installation on an Existing Wall: Prep, Substrate, and the Full Process
If you are adding a room, enclosing a patio, or building a fireplace in Scottsdale, at some point the framing goes up and you need new stucco to match the house. This guide walks through stucco installation on an existing wall assembly, step by step, so you know what a legitimate contractor should be doing before anyone asks for a deposit. Stucco is still the dominant exterior here; according to the National Association of Home Builders, it covered 48% of new single-family homes started in the Mountain division in 2024. That means plenty of crews do this work, and plenty of ways exist to do it wrong.
The process below applies to the two common situations homeowners run into: applying stucco to a newly framed wall that ties into existing stucco, and applying a new stucco coat directly over an existing wall surface. Both follow the same logic. Prep the substrate, control moisture, build the layers in order, and let each one cure. Skip a step and you get the cracks, hollow spots, and delamination that keep stucco repair companies busy.
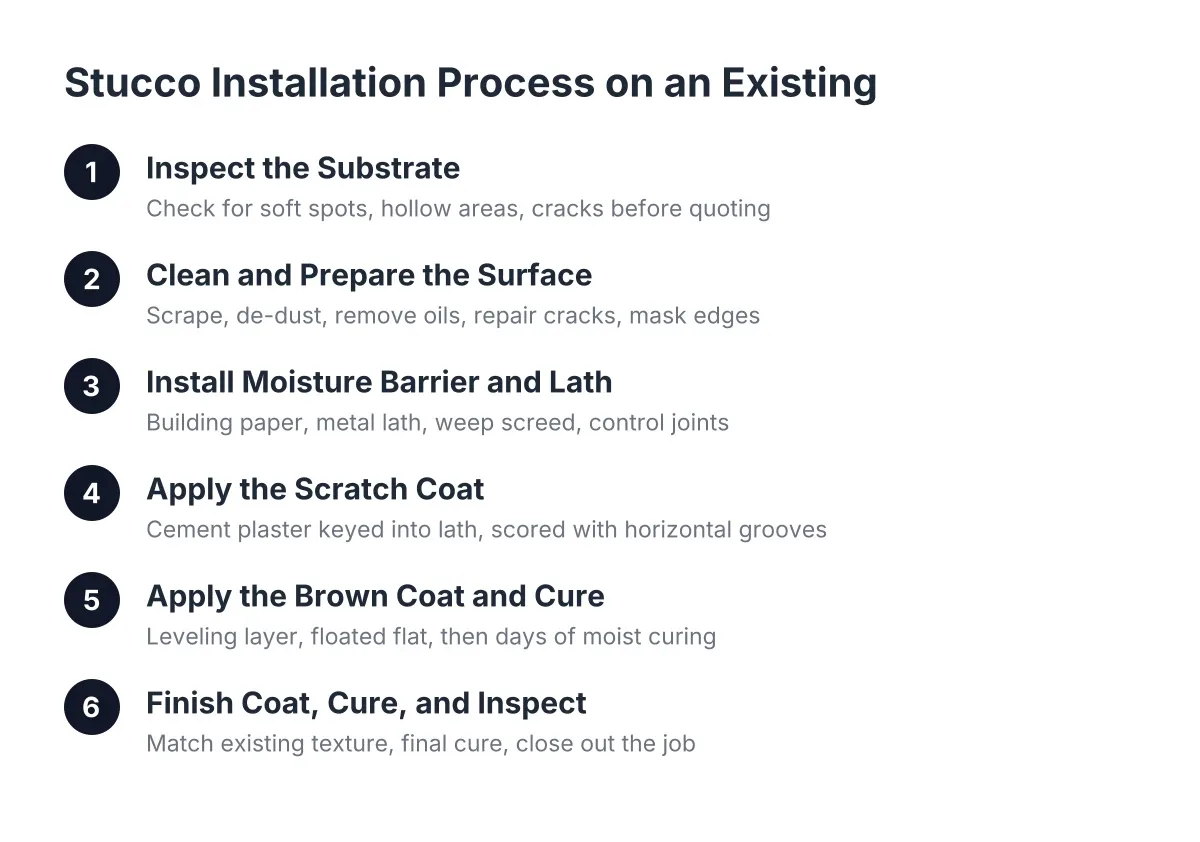
Step 1: Inspect the Substrate Before Anyone Mixes Material
First, the existing wall has to be sound. A contractor who quotes stucco installation on an existing wall without looking at the substrate is guessing, and that guess becomes your surprise cost later. On a sheathed frame wall, that means checking the plywood or OSB for soft spots, water damage, and gaps. On an existing stucco or masonry wall getting a new coat, it means tapping for hollow areas, scraping off loose burrs and rough spots, and marking any cracks or holes that need repair first.
This is also where the real scope gets written. Suppose a Scottsdale homeowner is enclosing a 200-square-foot patio. The inspection might turn up a hairline crack network on the adjoining original wall and a water-damaged section near a scupper. A straight contractor puts that repair work in the written scope now, with a line-item price. A contractor who skips the inspection finds it mid-job and hands you a change order. If the written quote does not describe the substrate condition and any repair work, ask why before you sign.
Step 2: Clean and Prepare the Surface
Next, the surface has to be clean enough for new material to grab. Stucco bonds mechanically and chemically, and any contaminant breaks that bond. The prep list is short but non-negotiable:
- Scrape off loose or flaking material until you hit sound stucco or sheathing
- Remove dust completely; brushing is not enough, the surface should be vacuumed or washed
- Clean off oils, grease, paint overspray, and efflorescence
- Repair cracks and holes in the existing wall so the new coat has a uniform base
- Mask windows, doors, fixtures, and the roofline
Painted surfaces deserve a separate mention. Paint resists fresh stucco, so a new coat applied over an existing painted wall typically needs a bonding agent rolled on first. When a new coat fails and comes off in sheets, poor cleaning or a skipped bonding agent is the usual cause. This is one of the most common failure points in stucco installation over an existing wall, and it is invisible once the finish coat goes on. Which is exactly why you want it named in the written scope.
Step 3: Install the Moisture Barrier and Lath
On a framed addition, the wall assembly starts with a weather-resistive barrier, usually two layers of building paper, lapped shingle-style so water drains out instead of in. Over that goes metal lath, fastened into the framing, not just the sheathing. The lath gives the base coat something to lock onto.
In addition, the edges matter as much as the field. Weep screed at the bottom lets trapped moisture escape. Casing bead trims the edges around windows and doors. Expansion and contraction channel goes in at control joints and where new wall meets old, so the inevitable movement happens at a planned line instead of a random crack across your new wall. In Scottsdale's heat swings, a missing control joint shows up as a diagonal crack within a year or two.
On a direct recoat over existing sound stucco or block, lath and paper may not be needed. However, that call depends on the condition and thickness of what is there, which is one reason a site visit beats a phone quote.
Step 4: Apply the Scratch Coat
Traditional three-coat stucco starts with the scratch coat, a layer of cement plaster pushed through and around the lath until it keys in behind the wire. While it is still workable, the crew rakes horizontal grooves across it with a scarifier. Those scratches are not decorative; they give the next coat a rough surface to bite into.
Before any coat goes over an existing masonry or stucco substrate, the wall should be wetted down thoroughly. Dry block or old stucco wicks the water out of fresh material before it can cure, which weakens the bond and invites shrinkage cracks. A crew that hoses the wall before applying material understands curing. A crew that trowels mud onto a bone-dry wall in July does not.
Step 5: Apply the Brown Coat and Let It Cure
The brown coat is the leveling layer. It goes over the cured scratch coat and gets screeded and floated flat, establishing the final plane of the wall. This is where a wavy wall gets corrected, and where a rushed job locks in bumps you will see in raking afternoon light for the next twenty years.
Curing is the step impatient contractors cut. The brown coat needs days of moist curing, often with periodic misting in our dry climate, before the finish goes on. Ask any bidder how long they wait between coats. The answer tells you whether they are scheduling around the material or around their next job.
Three-Coat and One-Coat Installation on an Existing Wall
Three-coat is the traditional system described above: scratch, brown, and finish, built over lath. One-coat systems combine the base layers into a single application over foam sheathing, which installs faster and adds some insulation. For an addition that has to tie into an older three-coat house, matching the original assembly usually blends better at the joint, because the thickness and movement of the two walls match. Synthetic stucco (EIFS) is a different animal entirely, a foam-and-acrylic system; mixing it against traditional stucco on the same elevation rarely blends well.
Step 6: Apply the Finish Coat and Match the Existing Texture
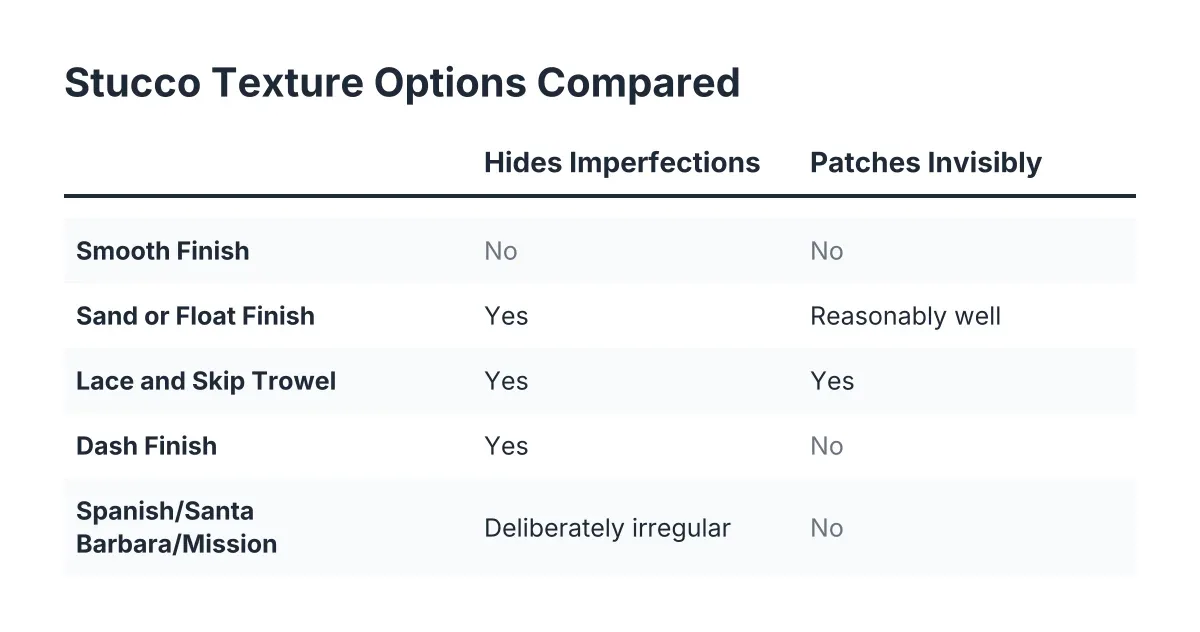
The finish coat carries the color and texture. On an addition, this is the step the whole project gets judged by, because your eye reads the wall where new meets old. Texture matching means replicating the original application technique, whether that is a sand float, lace, or dash finish, and feathering the transition so there is no visible seam. Color matching takes samples and test panels, not a guess from a fan deck.
This is where stucco installation and stucco repair overlap as skills. The same bonding rules apply at the joint between old and new: clean the existing edge, wet it down, and work the new finish into it. A contractor doing stucco installation in Scottsdale should be willing to do a test patch in an inconspicuous spot and let you approve the match before coating the whole wall. If they resist that, keep looking.
Step 7: Cure, Inspect, and Close Out the Job
Finally, the finish coat needs its own cure time before paint or sealant, if any, goes on. Walk the wall with the contractor in good light. Check the transitions to the original house, the texture consistency, and the terminations at weep screed, windows, and control joints. Hollow-sounding spots, visible lath pattern, or a color line at the old-to-new joint are defects, not character.
Close-out is also a paperwork step. You should end the job with a written record of what was installed, which system, how many coats, and what cure times were followed. If the finish fails later, that record is what separates a correctable warranty conversation from a shrug.
How long does stucco installation on an existing wall take?
Stucco installation on an existing wall typically takes one to three weeks from prep to finished cure, depending on the system. Three-coat stucco on a framed addition needs cure time between coats, so the calendar time runs longer than the labor hours. A direct recoat over sound existing stucco can finish in a few days.
The variable is curing, not troweling. A 300-square-foot addition wall might take a typical crew two days of actual application spread across two weeks of calendar time. Anyone promising a full three-coat install start-to-finish in three days is skipping cure time, and you will see where in a year.
What drives the cost, and how to spot a quote that will not hold
Cost on an install tied to an existing house comes down to a handful of drivers: square footage, the system chosen, access and wall height, how much repair the existing wall needs before new material goes on, and the difficulty of the color and texture match. For context on the repair side, Fixr.com puts the national average cost to repair stucco at $900 to $3,000, averaging about $1,700 for a buckled three-coat section in a 10×10-foot area. New installation on an addition is priced per square foot on top of whatever prep the existing wall needs.
For the skeptical homeowner, and in 2026 you have every reason to be one, the quote itself is the first inspection. A quote that will hold up names the substrate condition, the system (three-coat or one-coat), the lath and barrier materials, cure times, the texture-match process, and payment tied to milestones rather than a large upfront deposit. A rock-bottom number with none of that detail is not a bargain; it is a change order waiting for a signature. One honest limitation: if your existing wall shows signs of hidden water damage, soft sheathing, or past EIFS work, get a professional assessment before anyone quotes a recoat, because what is behind the surface can change the scope entirely.
If you need stucco repair, Scottsdale Stucco Repair can help.
Prefer to talk it through? Call (480) 637-3464 — a quick call is usually the fastest way to get a straight answer for your situation.