Professional Stucco Crack Repair: How the Process Works, Step by Step
If a crack in your exterior wall keeps getting longer every summer, or a contractor quoted you over the phone without ever looking at the wall, it helps to know what the professional stucco crack repair process actually involves. This guide walks through each step a stucco specialist follows in Scottsdale, from the first inspection to the final texture blend. Once you know the steps, you can tell a careful repair from a quick smear of caulk, and you can judge quotes on something better than price alone.
This matters here more than most places. Stucco remained the most-used exterior wall material in the Mountain division, which includes Arizona, at 48% of new single-family homes started in 2024, according to the National Association of Home Builders. Scottsdale walls take intense sun, monsoon rain, and big daily temperature swings, so cracks are common. The question is never whether stucco cracks. It is whether the crack in front of you is cosmetic or structural, and whether the repair will hold.
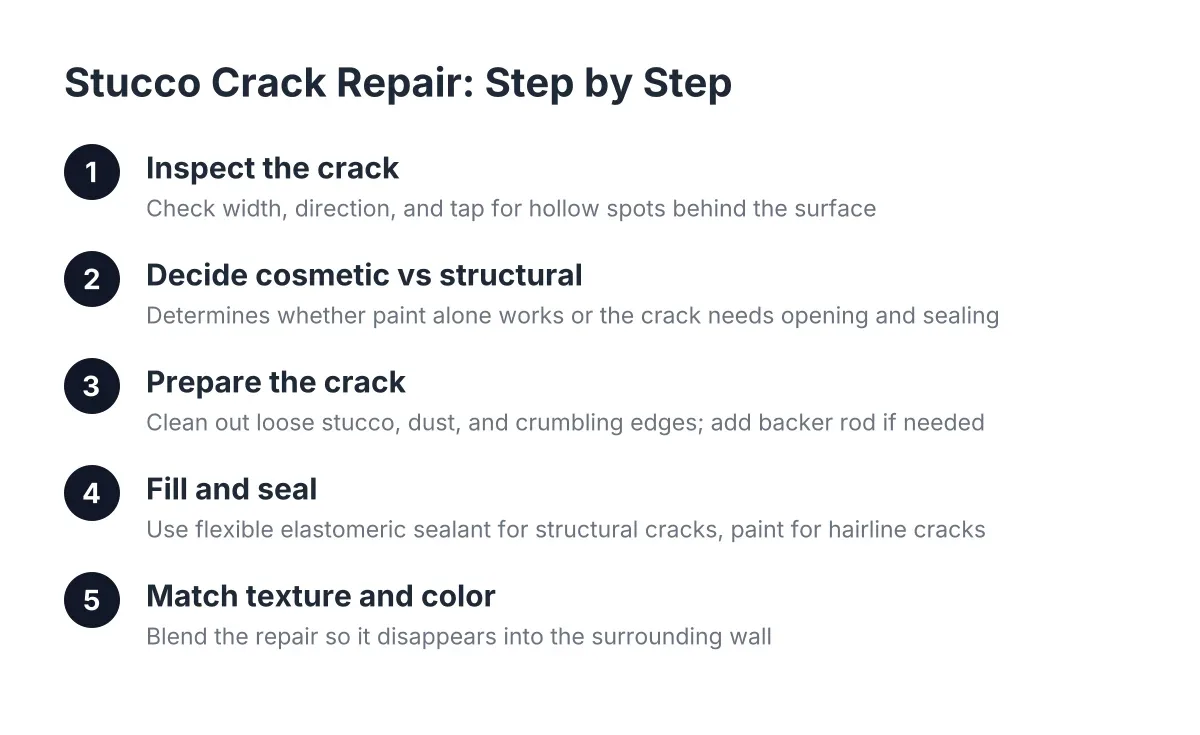
Step 1: Inspect the Crack and Read What It Is Telling You
A proper repair starts with eyes and hands on the wall, not a phone estimate. A specialist looks at three things: width, direction, and what is happening behind the surface.
Width is the first filter. Hairline cracks, thinner than a credit card edge, are usually cosmetic. They often come from normal curing and surface movement, and a good quality primer and paint can bridge and seal them without any caulking at all. Cracks you can slide a coin into are a different category. They are wider and deeper, they move with the wall, and they need to be filled, not just painted over.
Direction tells you about cause:
- Hairline spiderweb or map cracks usually trace back to the finish coat curing. Cosmetic.
- Diagonal cracks running from window or door corners point to the wall flexing at its weakest spots. Common in Scottsdale heat cycles, worth repairing properly before monsoon season.
- Long vertical cracks can follow settling or a joint in the framing. Repairable, but watch whether they grow.
- Horizontal or stair-step cracks, especially wide ones near the foundation, deserve a closer look. These can signal movement that a stucco patch alone will not fix.
Finally, the inspector taps the wall around the crack. A hollow sound, soft spots, or staining after storms means water has already gotten behind the stucco. At that point the job shifts from crack repair to water damage stucco repair, and the scope changes before any material goes on the wall.
Step 2: Decide Whether the Crack Is Cosmetic or Structural
So are stucco cracks dangerous? Most are not. The majority of stucco cracks are cosmetic, caused by curing, heat expansion, and minor settling, and they threaten the look of the wall more than the structure. A crack becomes serious when it is wide, growing, letting water behind the wall, or paired with hollow or bulging stucco. Those signs mean the problem runs deeper than the finish coat.
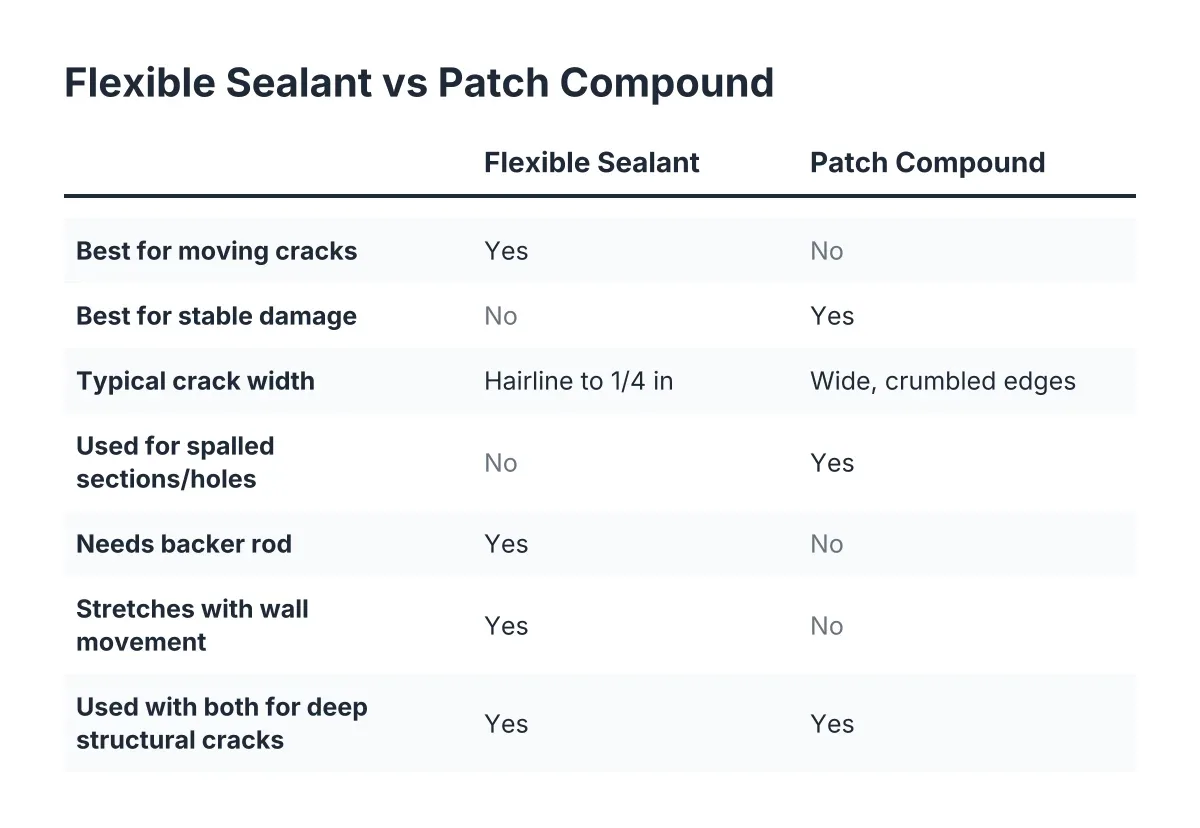
This decision drives everything else. A superficial crack does not need sealant forced into a cavity; paint will flood and seal the hairline on its own. A structural crack needs the opposite treatment: it must be opened, backed, and sealed so the joint can flex without reopening.
Here is the part homeowners underestimate. Behind the stucco sits a layer of building paper that acts as the real water barrier. Leave a structural crack open for years and that paper dries out and turns brittle. Once the wall flexes enough to tear brittle paper, water gets to the sheathing, and a $500 crack repair becomes a tear-out and replacement job. Acting in year one instead of year five is usually the difference between a patch and a wall section.
One honest caveat: if a crack pairs with sticking doors, interior drywall cracks, or visible foundation movement, a stucco contractor is not the right first call. Bring in a structural engineer or foundation specialist before spending money on the finish.
Step 3: Prepare the Crack So the Repair Can Hold
Preparation separates repairs that last from patches that pop out in a year. A specialist does not squeeze sealant into a dusty, closed crack and call it done.
First, the crack gets opened slightly and cleaned out. Loose stucco, dust, and crumbling edges come out with a scraper, a grinder, or a wire brush. Sealant needs clean, sound material on both sides to grip. Skipping this step is the single most common reason a repaired crack reopens along the exact same line.
Next, on wider structural cracks, the crew sets a backer rod into the gap. Backer rod is a closed-cell foam cord that creates a backing inside the crack before sealant goes on, according to Sika. It controls the depth of the sealant so the joint stays flexible instead of being filled solid. A solid, deep plug of caulk cannot stretch, so it tears the first summer the wall moves. A properly backed joint stretches with the wall for years.
Step 4: Fill and Seal the Crack With the Right Material
With the crack clean and backed, the sealant goes in. For structural cracks, that means a flexible, paintable elastomeric stucco crack sealant tooled into the joint, not a rigid filler. Rigid material cracks right alongside the stucco the next time the wall expands. For hairline cracks, as covered above, quality paint or an elastomeric coating does the sealing on its own.
For cracks that are part of broader damage, such as a corner hit by a ladder or a section softened by a roof leak, the repair moves into stucco patching. The damaged material comes out, new base coat goes on in layers, and the work proceeds from the bottom of the wall upward so each course supports the next. On a badly deteriorated corner, the technically correct fix is to remove the stucco and repatch the full wall section from corner to corner, rather than spot-patching the worst square foot. A partial patch is quicker and cheaper, and it can be a fair trade-off for a seller on a deadline, but the underlying cause, whether vibration, drainage, or a sprinkler hitting the wall, still needs fixing or the crack comes back.
Step 5: Match the Texture and Color So the Repair Disappears
A sealed crack that shows is a half-finished job, and this is where professional stucco crack repair earns its cost. Scottsdale homes carry specific finishes: sand, lace, smooth, and knockdown dash among them. Matching them takes practice.
For a knockdown dash finish, for example, the crew sprays finish coat onto the patched area and then lightly trowels it down so the texture blends into the surrounding wall. Color matching follows, either by tinting the finish coat or by painting the repaired section out to a natural break line like a corner or a reveal, so there is no visible halo around the patch. For a pre-listing seller, this step is the whole point. A buyer walking the exterior before an offer should not be able to find the repair.
How the Professional Stucco Crack Repair Process Compares to a DIY Kit
A stucco crack repair kit can handle a single cosmetic hairline crack if you clean the crack, apply the sealant correctly, and accept a visible texture difference. Professional repair earns its cost when cracks are wide, recurring, or spreading, when the wall sounds hollow or shows stains, or when the finish has to disappear for an HOA, an inspection, or a listing.
Consider a hypothetical Scottsdale seller three weeks from listing photos. Say the inspector flagged a diagonal crack off a bedroom window and a stained patch below a parapet. A tube of caulk from the hardware store would fill the crack in an afternoon, but the smeared line and mismatched texture would show in every photo, and the stain means water is already moving behind the wall. In that scenario, a specialist opens the crack, backs and seals it, cuts out the damaged patch, and blends texture and color so both repairs vanish. The caulk route risks a re-inspection note; the proper repair closes the item.
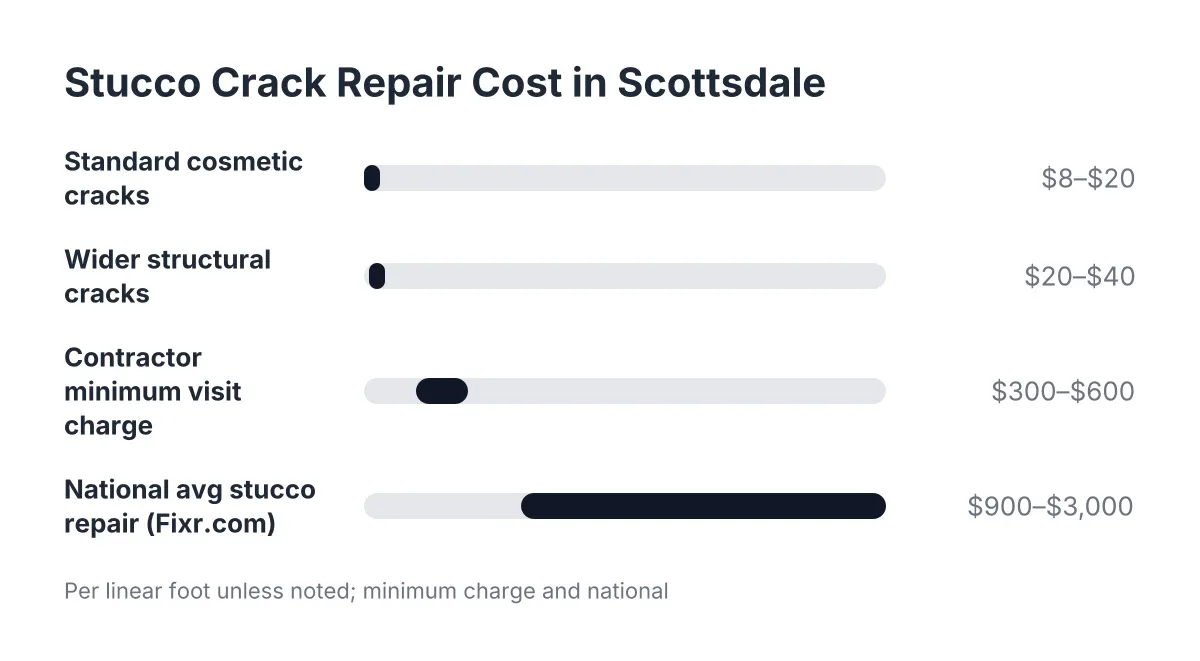
On cost, the ranges are wide because scope varies so much. For context, the national average to repair stucco runs $900 to $3,000, averaging about $1,700 for a buckled three-coat section about 10 feet square, according to Fixr.com. A single sealed and blended crack typically costs far less; water damage behind the wall costs more. Any 2026 quote worth trusting follows an in-person look at the wall, which is also the fastest way to filter the contractors who priced your wall sight unseen.
Finding the Right Local Specialist for the Job
When you search for exterior stucco repair near me, you will find national platforms that treat stucco as one line among dozens, painters who caulk and coat, and specialists who do this work daily. For a hairline crack headed for paint anyway, a painter may be enough. For anything structural, recurring, or visible, a specialist who follows the full stucco crack repair process is the safer call, because the inspection, backer rod, and texture match are exactly the steps a generalist tends to skip.
Ask any contractor three questions before you commit. Will you inspect the crack in person before quoting? How will you prep and back the crack before sealing it? How will you match my existing texture and color? A specialist answers all three in plain terms. If the answers are vague, keep looking. The crack took months to form; spending one more day finding someone who will repair it properly is the cheapest insurance you can buy.
If you need stucco repair, Scottsdale Stucco Repair can help.
Prefer to talk it through? Call (480) 637-3464 — a quick call is usually the fastest way to get a straight answer for your situation.