Stucco Crack Repair Methods: Flexible Sealant vs. Patch Compound
A crack in your stucco raises two questions fast: is it serious, and what actually fixes it? Most stucco crack repair methods come down to two camps: when deciding between a flexible sealant vs patch compound, picking the wrong one is why so many repairs crack again within a year. This guide walks through how to read the crack first, then match it to the right repair, the way a Scottsdale stucco contractor would if they were standing at your wall.
The short version: cracks that move need a flexible repair. Cracks that are stable can take a rigid patch. Everything below is about figuring out which one you have, and then doing the repair in the right order.
Step 1: Read the Crack Before You Buy Anything
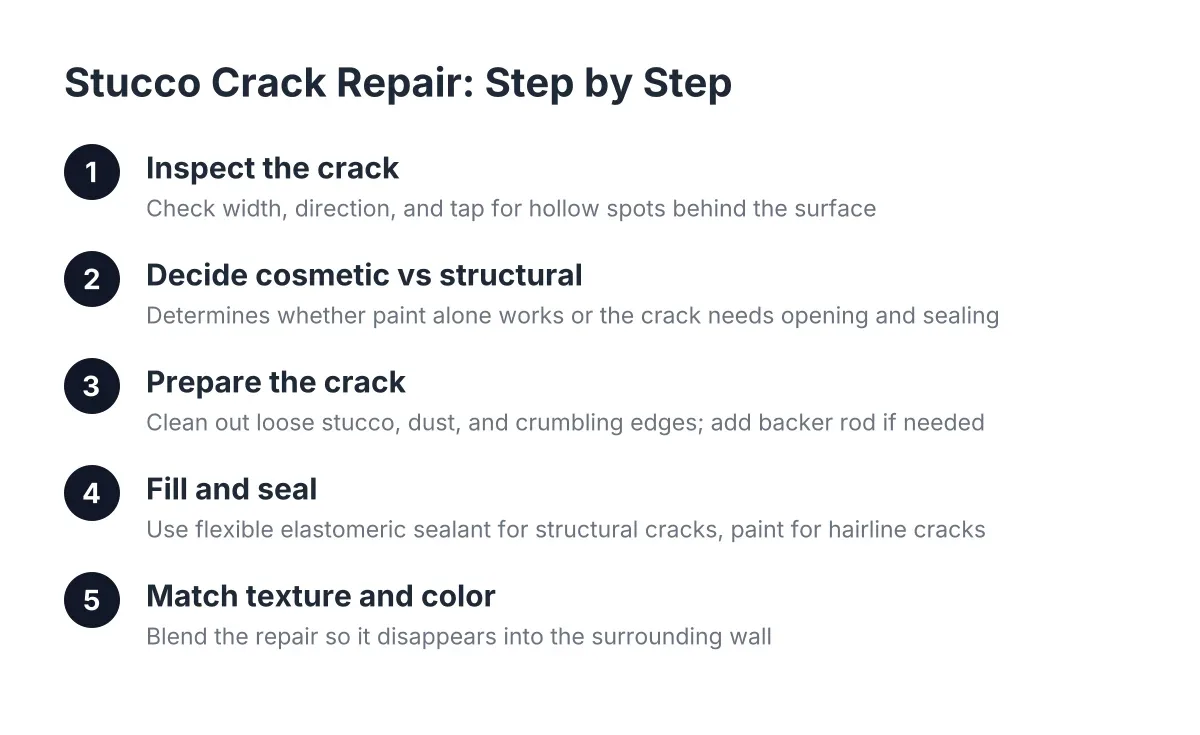
Stand at the wall and look at three things: width, direction, and depth. These tell you more than any product label will.
Width is the first filter. A hairline crack, thinner than a credit card edge, is usually cosmetic. Stucco is a cement product in a desert climate; it expands in the afternoon heat and contracts at night, and thin cracking is part of how it ages. A crack you can fit a nickel into is a different animal. That width means the wall has moved, and the repair has to account for movement.
Direction matters next. Vertical and diagonal cracks that run from window or door corners are typically settling or thermal stress, common in Scottsdale homes and usually repairable. Horizontal cracks, stair-step cracks that follow a block pattern, or cracks paired with a bulging or hollow-sounding wall point to something behind the stucco, often water damage or movement in the framing.
Depth is the last check. Press gently along the crack. If the stucco flexes, sounds hollow, or crumbles at the edges, the crack is a symptom, not the problem. One common exception worth knowing: a corner crack where the stucco meets a hard concrete foundation is usually minor. The foundation and the stucco expand at different rates, and the softer stucco gives first. That is an annoyance, not a structural warning.
Step 2: Choosing Sealant vs Patch Compound for Your Repair
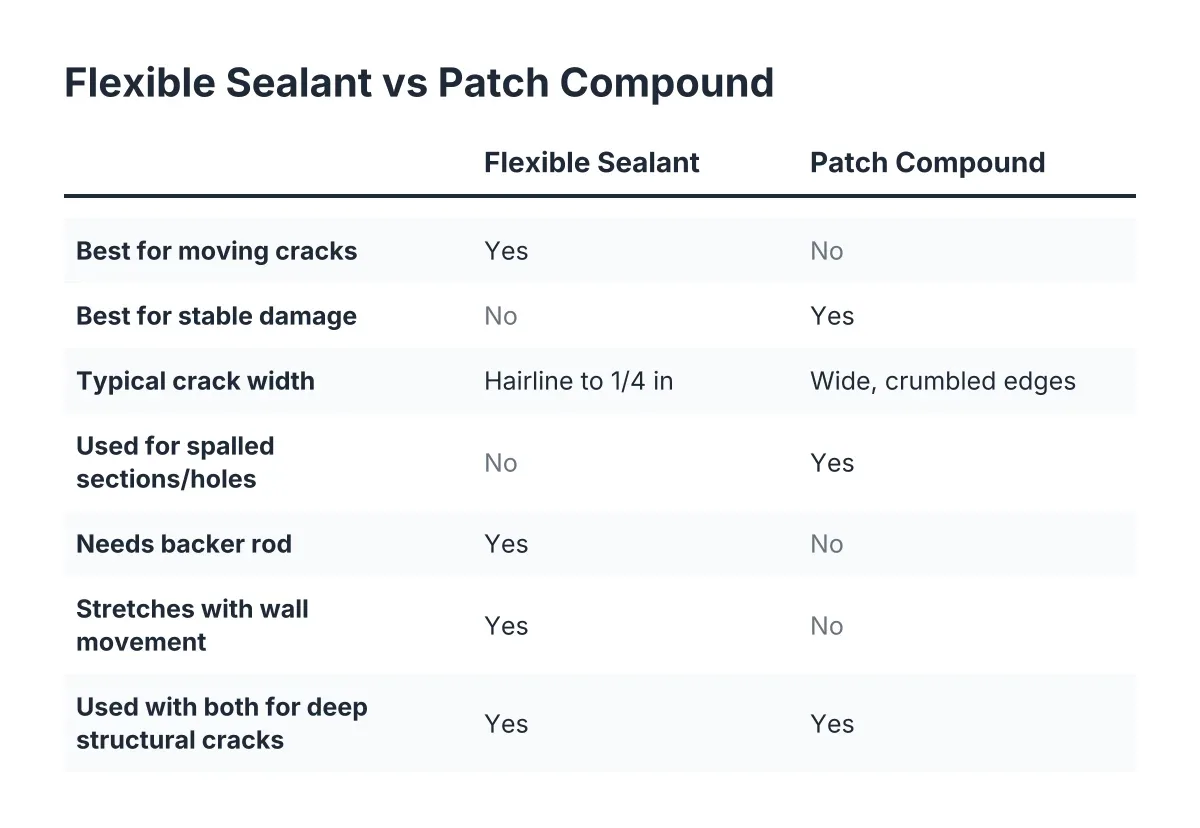
Choosing between the two main stucco crack repair methods is the decision that determines whether the fix lasts. Here is the rule a specialist works from:
- Flexible sealant (elastomeric or polyurethane caulk): for cracks that move. Hairline to about 1/4 inch wide, especially cracks that grow in summer and tighten in winter. The sealant stretches with the wall instead of fighting it.
- Rigid patch compound (cementitious or polymer-modified stucco patch): for stable damage. Spalled sections, crumbled edges, holes in a wall, and wide cracks where the loose material must be cut out and rebuilt.
- Both together: for wide, deep structural cracks. Backer rod and flexible sealant fill the joint, then a patch compound and texture coat hide the repair.
The classic homeowner mistake is reversing this. Smearing rigid patch compound into a moving crack gives you a repair that looks clean for one season, then cracks along the exact same line because the wall kept moving and the patch could not. The crack by your window that gets longer every summer? That one is telling you it moves. It needs flexibility, not a harder filler.
Painters tend to default to caulk and paint on everything, and handymen tend to default to patch compound on everything. A stucco specialist picks per crack, which is the whole difference.
Step 3: Prep the Crack So the Repair Can Hold
No sealant or patch sticks to dust, chalky paint, or loose stucco. Prep is most of the job.
First, open the crack slightly. For anything beyond a hairline, use a utility knife or a small grinder to widen the crack to about 1/4 inch and undercut the edges. This feels backward, making the crack bigger, but it gives the repair material something to grip.
Next, clean it out. Brush or blow the dust from the crack, then rinse and let it dry fully. In Scottsdale that rarely takes long, but trapped moisture under a patch is how you get a bubble or a stain later.
In addition, check what is behind a wide crack. If you can see torn black building paper or daylight behind the lath, stop. The waterproofing layer is compromised, and sealing the surface would trap the problem. That is a cut-out-and-rebuild repair, covered in Step 6.
Step 4: Seal Moving Cracks with Backer Rod and Flexible Sealant
For cracks wider than about 1/4 inch that still move, do not pump them full of caulk from the bottom up. Sealant needs the right shape to stretch, and a deep bead tears.
Start with backer rod, a closed-cell foam cord that, according to Sika, creates a backing inside the crack before sealant goes on. Press it into the crack with a putty knife so it sits just below the surface. The sealant then forms a controlled-depth bead over it that can flex without pulling loose.
Apply an elastomeric or polyurethane stucco crack sealant over the rod, tool it flat, and feather the edges. While the sealant is still tacky, press sand or loose stucco texture into it so the repair does not read as a smooth glossy stripe on a textured wall. Clear stucco crack repair sealants exist for hairlines on walls you do not want to repaint, but on anything wider, a textured and painted repair hides far better.
Timing matters here more than people expect. In the Valley, do sealant work in the early morning. Caulk applied to a wall in the hot afternoon sun skins over too fast, behaves poorly, and bonds worse. A crew scheduling a large crack repair in July will be at your wall at 6 a.m. for a reason.
Step 5: Rebuild Stable Damage with Patch Compound
For crumbled edges, holes, and cracks where the stucco around them has failed, flexible sealant has nothing solid to bond to. When comparing sealant and patch compound, this is where the choice matters most for structural integrity.
Cut out all the loose and soft material back to sound stucco. Patching over weak stucco is the number one reason patches pop out; the patch is only as strong as what it grips. If the lath or wire behind the hole is rusted or torn, replace that section and tie new wire into the old.
Then apply the patch. Modern polymer-modified, rapid-setting stucco patch products can replace the traditional three-coat system in a single application for repair work, and many bond to existing stucco without a separate primer. Materials for a small patch, including patch compound, latex additive, and corner mesh, are stocked at general hardware stores. The product is not the hard part.
The texture is the hard part. A patch that is structurally perfect but troweled smooth on a sand-finish or lace-finish wall will show from the street forever. Matching the existing texture, and then the color, is where a repair either disappears or announces itself. Honest trade-off: color matching aged, sun-faded Scottsdale stucco is difficult even for professionals, and sometimes the right call is painting the full wall plane so the patch blends completely.
Step 6: Know When the Crack Is Beyond Either Method
Some cracks are not a sealant-or-patch decision at all. Call a stucco professional, and in some cases a structural evaluation, when you see:
- Horizontal or stair-step cracks wider than 1/4 inch, especially on multiple walls
- A wall section that sounds hollow, bulges, or stays stained after every storm
- Cracks that reopen within a year of a correct repair
- Soft or crumbling stucco around the crack, a sign of water damage behind it
Waiting on these gets expensive in a specific way. The building paper behind old stucco turns brittle with age, and once a structural crack lets the wall flex, that paper can tear. At that point every monsoon pushes water at your sheathing and framing, and you have moved from stucco crack repair into water damage stucco repair, which is a bigger job. For context on scale, Fixr.com puts the national average cost to repair stucco at $900 to $3,000, averaging about $1,700 for a buckled 10×10-foot three-coat section. A moving hairline sealed early costs a fraction of that.
Also know the honest limit of spot repairs. On a badly deteriorated corner, the technically correct fix is removing the stucco and repatching the full wall section corner to corner, not dabbing compound on the worst spot. And no repair method outlasts an unaddressed cause; if vibration, a grading problem, or a roof leak drove the crack, fix that too or the crack returns.
Step 7: Decide Between a Repair Kit and a Professional
A stucco crack repair kit handles one specific situation well: a stable hairline or narrow crack on a flat, accessible wall you plan to repaint anyway. If that is your crack, a careful Saturday with sealant and a caulk gun is a reasonable DIY stucco crack repair.
Hire a professional when the crack is wide, moving, structural, high on a two-story wall, or on a wall where the texture and color match will be visible from the street. Suppose a Scottsdale homeowner has a diagonal crack running from a window corner, an HOA letter on the counter, and a listing photo shoot in three weeks. In that scenario, a kit fixes the crack but not the problem, which is making the repair invisible. That takes texture matching, color matching, and someone who looks at the wall before quoting it.
This matters just as much on additions. New stucco on a room addition or patio enclosure meets old, sun-aged stucco at a joint, and that joint is where cracks and mismatches show first. Stucco remains the dominant exterior on homes here; the National Association of Home Builders reports it covered 48% of new single-family homes started in 2024 in the Mountain division, which includes Arizona. Plenty of walls, plenty of cracks, and the same two stucco crack repair methods behind nearly every fix that lasts.
Read the crack, match the method, prep like it matters, and handle the texture last. That order is the entire difference between a repair that disappears and one you redo next summer.
If you need stucco repair, Scottsdale Stucco Repair can help.
Prefer to talk it through? Call (480) 637-3464 — a quick call is usually the fastest way to get a straight answer for your situation.