Stucco Patch Kit vs. Professional Repair on Block Walls: What Actually Holds
Walk into any hardware store in Scottsdale and you will find a shelf of ready-mix stucco patch products. The question most homeowners with a cracked block wall are asking is not which bucket to buy. It is the stucco patch kit or professional repair question: when does a $20 tub of patch actually hold on concrete block, and when are you paying twice because the first fix failed? This guide walks through both paths step by step, so you can decide with your eyes open before you spend money on either one.
Block walls are their own animal. A perimeter wall, a masonry fireplace, or a block addition does not behave like wood-framed stucco. The block moves with heat, cracks telegraph through from mortar joints, and a patch that ignores the cause comes back within a year or two. Stucco is not a niche finish here either; it remained the top exterior wall material in the Mountain division, which includes Arizona, at 48% of new single-family homes started in 2024, according to the National Association of Home Builders. That is a lot of block and stucco needing repair as it ages.
Step 1: Assessing Stucco Patch Kit Damage on Block
Before you buy anything, read the wall. The type of damage decides whether a patch kit is even in the conversation.
- Hairline cracks under 1/8 inch. Usually surface shrinkage or minor thermal movement. A patch kit can handle these.
- Stair-step cracks following the mortar joints. These trace the block pattern underneath. They point to movement in the wall itself, and no surface patch fixes movement.
- Holes from impact. A trailer hitch, a landscaping accident, a removed fixture. Small holes are DIY-friendly; anything wider than a fist gets harder fast.
- Bulging, hollow-sounding, or crumbling stucco. Tap the wall. A hollow drum sound means the stucco has separated from the block. Patching over delamination is throwing money at a wall.
- Staining, soft spots, or efflorescence (white chalky residue). These signal water damage behind the surface. The water path has to be fixed first, or the repair fails.
In addition, check whether your wall has traditional cement stucco or a synthetic (EIFS) finish. Synthetic stucco repair uses different materials and a different process; a cement-based stucco hole filler will not bond correctly to a foam-backed synthetic system. If you are not sure which you have, that alone is a reason to get a professional to look before you open a bucket.
Step 2: Understand What a Patch Kit Can and Cannot Do on Block
A ready-mix patch is a polymer-modified compound designed to fill small defects in one application. That is genuinely useful. On repair work, these rapid-set products can replace the old three-coat system with a single pass, and many bond to existing stucco without a separate primer. For a hairline crack on a backyard block wall, that is exactly the right tool.
However, the limits show up fast on block:
- Movement wins. If the block wall is settling, or a nearby gate post vibrates it daily, the crack reopens through the patch. The patch treated the symptom.
- Texture match is the giveaway. Fiber-reinforced patch compounds sit thick and stiff. On a smooth or sand-finish wall, the patch reads as a scab from the street. A visible patch on the front of the house costs you curb appeal, which matters if resale is anywhere in your plans.
- Color match is worse. Even a good texture match glows a different shade for years unless the whole panel is recoated or the pigment is matched deliberately.
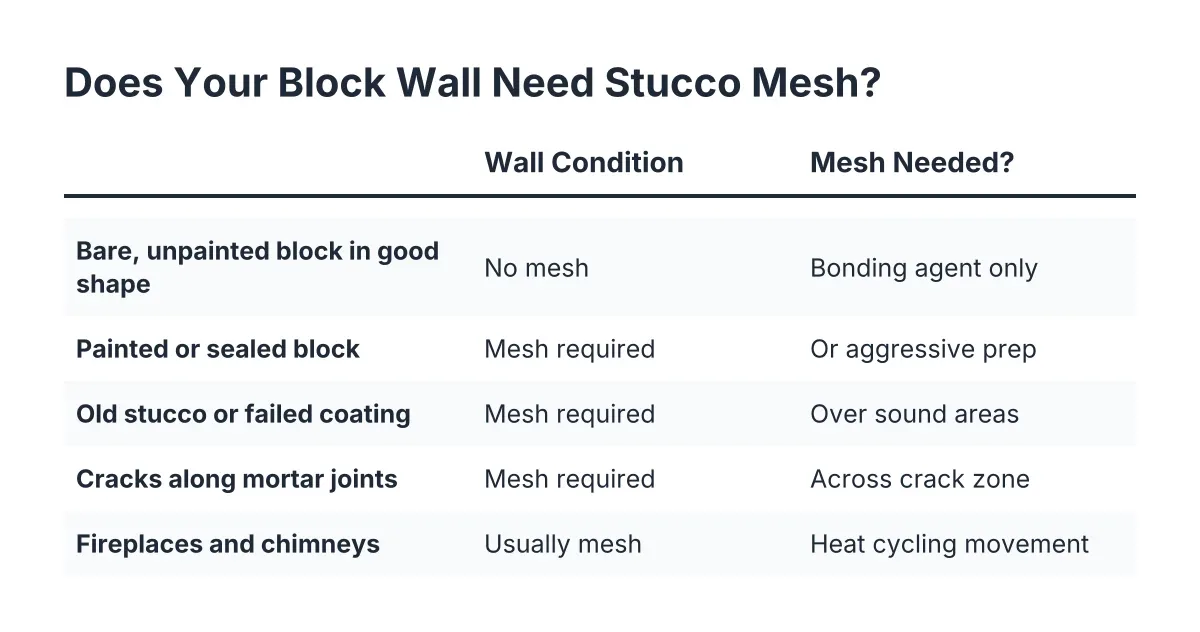
- Depth is the hard stop. Most kits are rated for shallow fills. A hole exposing bare block or broken lath needs base coat material, and often a piece cut from a stucco wire mesh roll to give the new material something to grab. That is a multi-stage repair, not a squeeze-tube job.
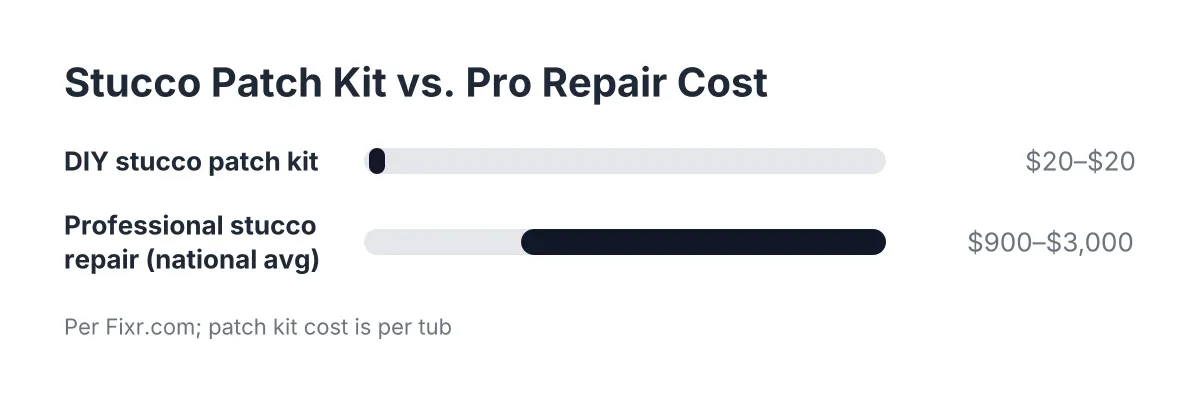
For scale, the national average cost to repair stucco runs $900 to $3,000, averaging about $1,700 for a buckled 10×10-foot area of three-coat stucco, according to Fixr.com. When the DIY patch fails and a pro has to cut out both the damage and your patch, you pay that number plus the removal work.
Step 3: If You DIY, Do the Small Repair Right
Suppose you have a genuine hairline crack on a side-yard block wall, out of direct sightlines. Here is the honest DIY path, in order:
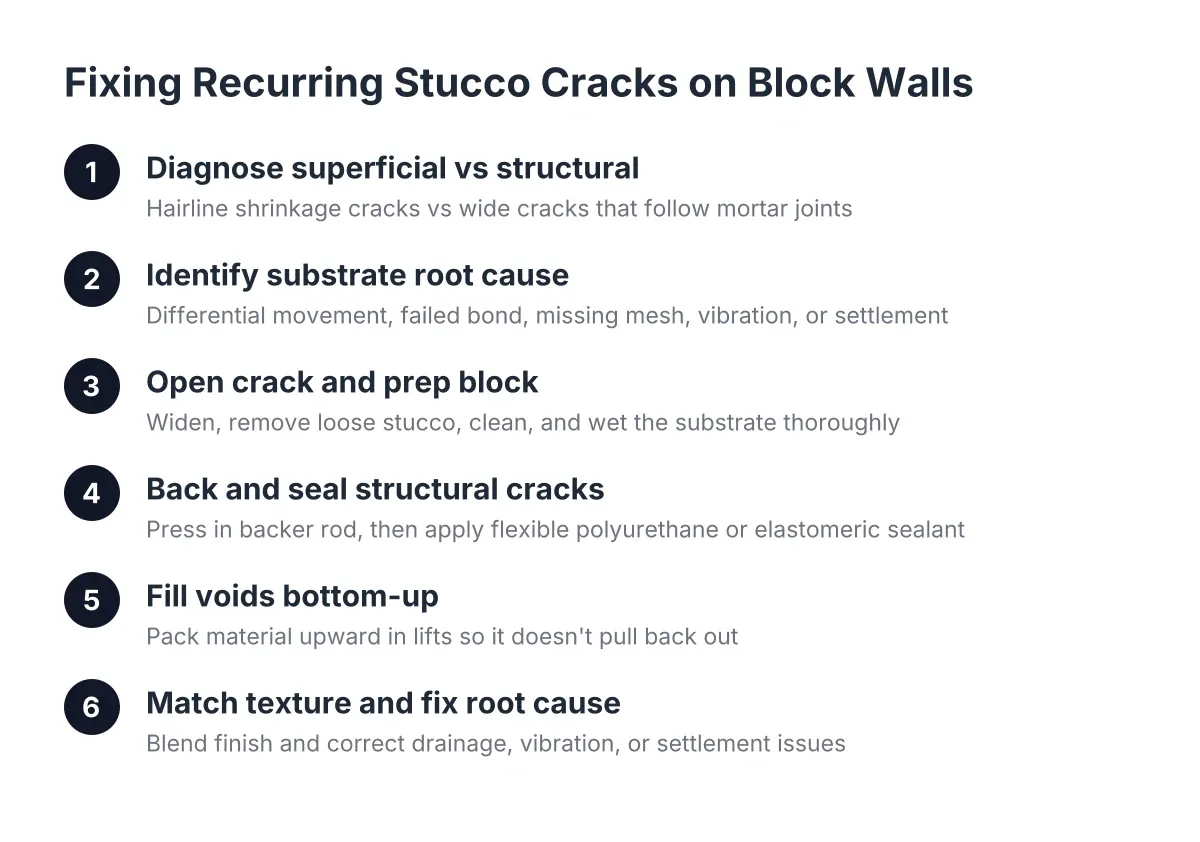
- Clean the crack. Brush out loose material and dust. Rinse and let it dry fully; Scottsdale heat makes this quick, but damp block kills adhesion.
- Widen a hairline crack slightly with a scraper so the filler has something to key into. A crack you cannot get material into is a crack you have not filled.
- For wider cracks, use backer rod first. Backer rod is a closed-cell foam cord pressed into the crack to create a backing before sealant goes on, according to Sika. It stops the filler from sinking endlessly into the void.
- Apply the patch in one coat, then stop. Non-professionals should apply one coat per day and let it set overnight before the next, rather than stacking coats in a single session the way experienced crews do. Rushing coats is the most common DIY failure.
- Texture while the material is still workable. Dab with a sponge, brush, or trowel to mimic the surrounding finish. Test your technique on a scrap board first.
- Prime and paint the full section, not just the patch, once cured. Painting corner to corner hides the repair far better than spot-painting ever will.
Materials for a small repair like this, including patch compound, latex additive, and mesh, are stocked at general hardware stores. Budget an afternoon plus a follow-up day for paint. That is the fair fight a patch kit can win.
Step 4: Recognizing When Professional Repair Beats Your Stucco Patch Kit
A patch kit loses to professional repair the moment the damage involves movement, moisture, depth, or a visible surface where match quality matters. Stair-step cracking, hollow or bulging stucco, water staining, holes to bare block, and any damage on a fireplace or street-facing wall belong to a pro. On those jobs, the kit does not save money; it delays the real repair.
Here is why the pro path differs on block. The technically correct fix for a deteriorated section, say a beat-up wall corner, is to remove the stucco and repatch the full section corner to corner, not to dab the damaged spot. That is how you get an invisible result. A spot patch on a corner is quicker and cheaper, but if the underlying cause, like vibration or poor drainage, is not addressed, the crack returns. A competent contractor will tell you which situation you are in before quoting, and that conversation is itself a vetting signal.
Fireplaces deserve a specific mention because they drive so many of these searches. A masonry fireplace cycles through bigger temperature swings than any wall on your house. Fireplace stucco repair on block needs materials and cure timing chosen for that movement; a general-purpose patch on a firebox surround tends to crack along the same line within a season. Applying full scratch and brown coats is also harder than it looks, and it is the part of stucco on block walls work most worth hiring out even for confident DIYers.
A hypothetical Scottsdale scenario worth learning from
Say a homeowner in a 1998 block-wall neighborhood patches a stair-step crack on the front perimeter wall with a quart of ready-mix. It looks fine for a summer. By the next spring the crack has reopened through the patch, wider, and now there is a raised, mismatched scar around it. In that scenario, the eventual professional repair includes grinding out the failed patch, addressing the drainage that was moving the footing, repatching the full panel, and matching color and texture. The original problem cost one repair; the detour cost two.
How to vet the professional side without getting burned
If you have been burned by a contractor before, the patch-versus-pro decision is also a trust decision. You do not have to take anyone's word for it. Before hiring stucco repair in Scottsdale, ask for:
- A written scope that names the repair method, not just "fix stucco."
- Whether they will patch the spot or repatch corner to corner, and why.
- How they will match texture and color, and whether they recoat the full panel.
- Proof of Arizona licensing and insurance, which you can verify yourself with the state contractor board rather than trusting a logo on a website.
- A payment structure that does not front-load the whole job in cash.
A poor texture match on a past repair usually means a less skilled worker patched it without matching the original finish technique. Ask to see photos of their block-wall and fireplace repairs specifically, not just full installs.
Step 5: Make the Call Based on Cause, Location, and Match
Use a simple decision rule. If the damage is shallow, stable, small, and out of sight, the patch kit is the right call, and Step 3 will get you a durable result. If the damage is moving, wet, deep, structural, on a fireplace, or on a wall people see, hire it out; on those repairs, the stucco patch kit versus professional question answers itself once you price a redo.
One honest trade-off to sit with: professional repair costs more up front, and even good pros cannot always make a spot patch fully invisible on an aged, sun-faded wall without recoating the whole section. Sometimes the right answer is a larger scope than the crack itself, and a straight-talking contractor will say so rather than sell you the cheap version that comes back. As of 2026, with block walls and stucco still the default construction around Scottsdale, that judgment call, patch the spot or repatch the section, is the difference between a repair you forget about and one you stare at every time you pull into the driveway.
If you need stucco repair, Scottsdale Stucco Repair can help.
Prefer to talk it through? Call (480) 637-3464 — a quick call is usually the fastest way to get a straight answer for your situation.