Can You Patch Over an Old Stucco Repair? Blending Rapid Set Stucco Patch Right
A common Scottsdale situation: an old stucco patch on your wall never matched, and now it has cracked or the wall around it needs more work. You can patch over an old repair, and a rapid set stucco patch is often the right material for the job. However, the reason the first patch stands out is almost never the product. It is texture, edges, and prep. This guide walks through the full process step by step, including what it costs, what can go wrong, and how to get a patch that disappears once the wall is painted.
This matters most in two cases. First, if you just had a block wall or addition built and the contractor left old patch scars on the adjoining house wall, the new stucco will only look finished if the old repairs blend too. Second, if you are prepping a home to list and an inspector or realtor flagged visible patches, the fix has to look clean and go fast. For context on cost, Fixr.com puts the national average for stucco repair between $900 and $3,000, averaging about $1,700 for buckled three-coat stucco in a 10×10-foot area. A single blended patch over an old repair usually lands well under that; a wall with several failed patches climbs toward it.
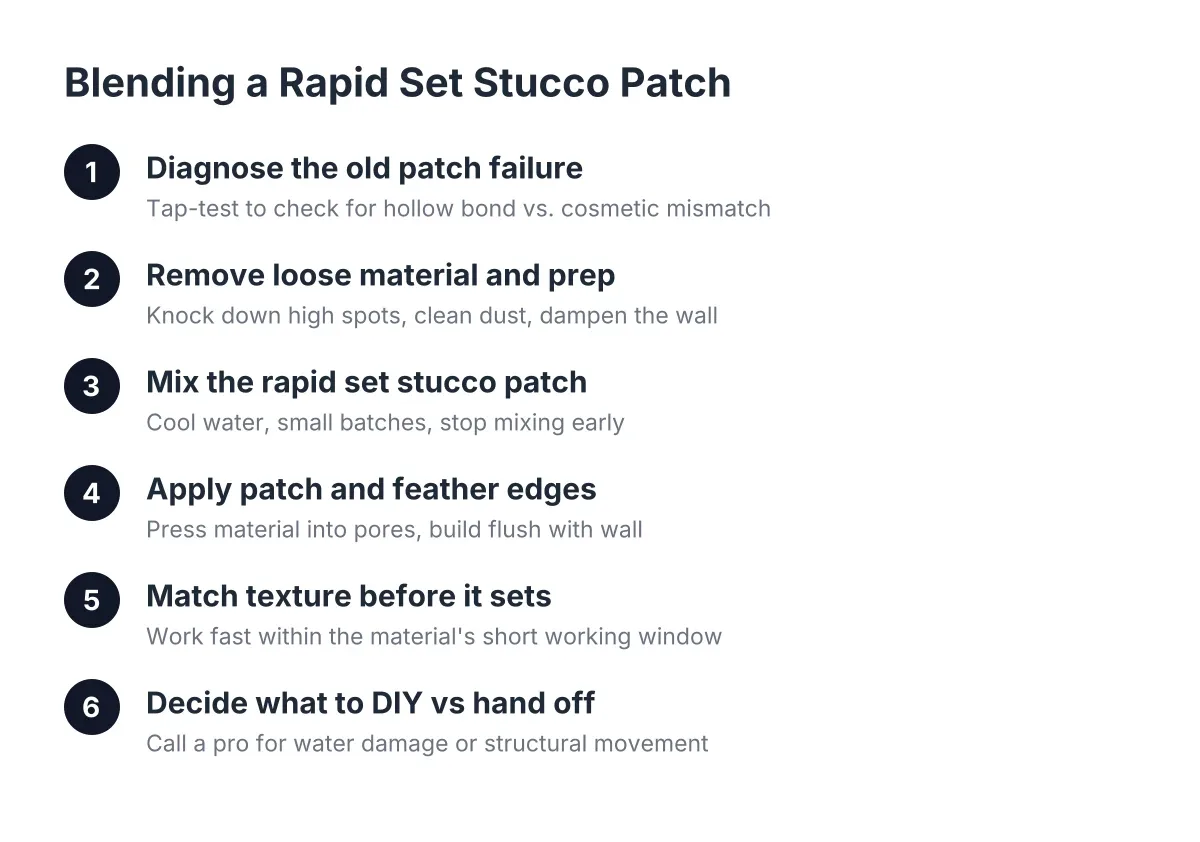
Step 1: Figure Out Why the Old Patch Failed
Before you mix anything, look at the old repair and answer one question: did the patch fail, or did it just never match? The fix is different for each.
A patch that never matched but is still solid is a cosmetic problem. You can blend over it. A patch that cracked, hollowed out, or pulled away from the wall is a bond problem, and covering it only buries the failure for a year or two.
Tap the old patch with a screwdriver handle. A solid thunk means good bond. A hollow, papery sound means the patch has separated from the base coat and needs to come out. Also check for these warning signs:
- Cracks running through the patch and continuing into the surrounding stucco, which can point to movement in the wall itself
- Staining, softness, or bubbling paint, which suggests water damage behind the stucco
- A patch near a parapet cap, window head, or roofline where water may be entering from above
If you see signs of water damage or structural movement, stop and have a stucco repair contractor look at it. Patching over an active leak is wasted work; the new material will fail the same way the old one did.
Step 2: Remove Loose Material and Prep the Surface
Assuming the old patch is sound, prep decides whether the new one holds. Scrape away any loose or flaking material at the edges of the old repair with a stiff putty knife or masonry chisel. You want to reach material that will not move.
Next, knock down any high spots. Old patches often sit proud of the wall, and that raised edge is half of why they catch light and show. Scrape or grind the hump down so the old patch sits flush or slightly below the surrounding plane. It is easier to blend by knocking down and scraping high spots than by tearing out a base coat that is otherwise doing its job.
Then clean the area. Brush out dust and wipe or rinse the surface. Dust is the most common reason a patch releases early. If the old repair has a wide crack at its edge, deeper than about half an inch, press a foam backer rod into it first; according to Sika, backer rod is a closed-cell foam cord used to create a backing inside a crack before applying sealant or fill material. That keeps you from pumping repair material into a void.
Finally, dampen the wall. In Scottsdale heat, dry stucco pulls water out of fresh material fast, which weakens the cure. Mist the area with a spray bottle or hose until the surface is damp but not dripping.
Do you need a bonding primer over old stucco?
A bonding primer is not always required when patching over old stucco. Some rapid set stucco patch products adhere directly to sound existing stucco without a separate bonding agent, while some traditional cement patch methods still call for one. Check the instructions on the bag you bought; the manufacturer's data sheet is the final word.
The practical rule: if the old patch is painted with a glossy or elastomeric coating, scuff it or use a bonder regardless. Fresh cement material bonds to porous surfaces, not to slick paint film.
Step 3: Mix the Rapid Set Stucco Patch Correctly
Correct mixing of a rapid set stucco patch comes down to three things: cool water, small batches, and stopping the mixer early. Add powder to water, not water to powder, and mix only until the lumps are gone. Over-mixing changes how the material handles on the wall and can shorten your working time.
Work in small batches. Fast-setting products give you a limited window, and Arizona heat shortens it further. Mix only what you can apply and texture before the material stiffens. If you have never used a fast-setting product, do a test batch first so the speed does not surprise you. For comparison, according to 3M, catalyzed body-filler-type products begin setting within about 2 minutes of mixing; cement-based fast-set patches give you more time than that, but the lesson is the same. Set your tools out before you mix, not after.
One more advantage worth knowing: polymer-modified fast-set patch material can replace the traditional three-coat system in a single application for repair work. You do not need separate scratch and brown coats to fix a patch-sized area, which is why this kind of repair often finishes in a day instead of a week.
Step 4: Apply the Patch and Feather the Edges
Load the material onto a hawk or the back of your trowel and press it firmly into the prepped area. Pressing, not spreading, is what seats the material into the pores of the old surface. Build it up flush with the surrounding wall, then screed off the excess.
The edge is where patches live or die. Feather the new material slightly past the repair boundary into the existing texture instead of stopping at a hard line. A crisp square border will read as a patch forever, no matter how good the texture match is. A feathered, irregular edge gets lost in the wall.
If you are covering a larger old repair, work in sections you can finish before the material sets. Keep a damp sponge and a margin trowel within reach so you can adjust edges while the patch is still workable.
Step 5: Match the Texture Before It Sets
Texture matching is the single biggest factor in whether a patch over an old repair disappears. Paint hides color differences; it does not hide texture differences. A patch with the wrong texture stays visible after painting, every time.
Study the wall around the repair first. Most Scottsdale homes carry a sand finish, a skip trowel, or a knockdown lace texture. Then recreate it while the patch is still soft:
- For sand finishes, float the surface with a sponge float in light circular passes.
- For skip trowel, flick or dab small amounts of material onto the patch, then lightly knock the high points down with a clean trowel.
- For lace or knockdown textures, apply a splatter coat, wait a few minutes, then flatten the peaks with a trowel held nearly flat.
A damp sponge is your blending tool. Work it over the transition zone where new material meets old texture, softening the line until you cannot find the boundary by eye. Textured, flattened finishes forgive small imperfections; smooth finishes do not, and a smooth-wall patch is one place where hiring out the texture matching pays for itself.
For example, suppose a homeowner in north Scottsdale just finished a block wall addition and the mason's tie-in left two fist-sized patch scars on the original house wall. In that scenario, a realistic Saturday looks like this: prep and scrape in the morning, patch and texture both spots by early afternoon with a fast-setting product, then paint the following day. Material cost might run $30 to $60 in patch mix and sundries as a rough estimate, against a few hundred dollars for a pro if the texture is tricky.
How long before you can paint a rapid set stucco patch?
Most rapid set stucco patch products accept paint far sooner than traditional stucco, often the same day or the next day, depending on the product, thickness, and weather. Traditional cement stucco needs weeks of curing before paint; fast-set repair material is formulated to shortcut that wait. Confirm the recoat window on your product's data sheet, since brands differ.
Before painting, mist the cured patch periodically on hot days to help it cure hard rather than dry out. Then paint past the patch, not just over it. Painting the whole wall section, corner to corner, hides the sheen difference between new and old paint. A properly matched and painted patch should become hard to find on the wall; if you can still spot it from ten feet away before painting, fix the texture first, because paint will not save it.
Step 6: Decide What to Handle Yourself and What to Hand Off
A single, sound, palm-sized old repair on a textured wall is a reasonable weekend project. Beyond that, the math changes. Call a pro when any of these apply:
- The old patch is hollow, cracked through, or sits over water damage
- The wall has a smooth or hand-troweled finish that punishes any texture error
- You have multiple failed patches, which usually points to a wall-wide problem better solved by resurfacing
- You are selling the home and the repair needs to pass a walkthrough on a deadline
The pre-listing case deserves its own word. Say a seller has a firm listing date and the inspection flagged three old patches that cracked again. In that scenario, the goal is not a museum-grade wall; it is a clean, matched repair with an invoice for the disclosure file, done before photos are taken. A stucco contractor who does color matching and texture matching daily gets there in one visit, and the cost of a few blended patches is small next to a price concession at the negotiating table.
The trade-off is honest to state: even a well-executed patch over an old repair is still a repair. If the wall underneath keeps moving or leaking, the cycle repeats. When patches keep failing in the same spot, the better spend is diagnosing the cause, and sometimes the answer is resurfacing that wall face rather than patching it a third time. The same judgment applies to new work; full Stucco Installation over a bare block wall or addition is a different scope than patching, with lath or bonding prep and multiple coats, and it is priced and scheduled as its own job.
Stucco is not a niche finish here. National Association of Home Builders data shows stucco remained the most-used exterior wall material in the Mountain division, which includes Arizona, at 48% of new single-family homes started in 2024. That is good news for anyone blending a patch: the products, the textures, and the contractors who know them are all local and easy to find.
Done in order, the process is straightforward. Confirm the old patch is sound, prep and dampen, mix small, press and feather, texture while soft, and paint wall to wall. Get those six steps right and the old repair, and the new one over it, both disappear.
If you need stucco repair, Scottsdale Stucco Repair can help.
Prefer to talk it through? Call (480) 637-3464 — a quick call is usually the fastest way to get a straight answer for your situation.